Data Sources (Admins Only)
Configuring Data Sources: Intake Mapping
You have control over what your organization considers a data source, with each data source representing a unique location from which LinePulse receives data. Multiple machines can be designated as a single data source. Likewise, multiple data creators can output data to a single LinePulse data source, or individual data sources can be configured for each data creator.
 Only Admins can configure data sources.
To create a data source
(If required) Select a plant.
From the Navigation menu, click SYSTEM SETTINGS .
LinePulse displays the Settings menu.
Click Data Management | Data Sources.
LinePulse displays the Data Sources table.
Click + New Source.
LinePulse displays the Add New Data Source dialog box.
Enter a Data Source Name.
The Data Source Name must match between the client-side configuration and Acerta data source configuration.
 LinePulse adds the Data Source Name to the Directory field as you type. You can override this suggestion in the next step.
(Optional) Enter a Directory.
Click ADD SOURCE.
LinePulse adds the new data source to the Data Sources worklist.
The new data source will be accessible from the Plant Overview module; however, you may have to refresh the screen before it will be visible.
To open an intake mapping configuration entry
(If required) Select a plant.
From the Navigation menu, click SYSTEM SETTINGS .
The Settings menu appears.
Click Data Management | Data Sources.
The Data Sources table appears.
In the Data Sources worklist, click INTAKE MAPPING for the data source you wish to configure.
The Intake Mapping screen appears.
To open an intake mapping configuration file
As part of the LinePulse pre-deployment activities, Acerta will help your organization determine your specific intake mapping schema, based on your sample intake mapping configuration file.
Open an intake mapping configuration entry.
Click + Choose File.
A Windows File Upload dialog box appears.
Select an intake mapping configuration file.
Click Open.
LinePulse displays the selected intake mapping configuration file.
To add an intake mapping table
Open an intake mapping configuration file.
Click ADD TABLE.
A blank intake mapping configuration entry appears.
There are two fields to configure, which represent the header and data portions of the file. You can now specify where LinePulse should look for the intake mapping header and data information.
To configure an intake mapping header
(With an intake mapping table loaded) Click the first empty box following the Header: label.
LinePulse adds a dotted box around the header start field.
Select the cell that marks the start of the header information.
LinePulse adds the cell location to the header start field.
Click the second empty box following Header: label.
LinePulse adds a dotted box around the header end field.
Select the cell that marks the end of the header information.
You may need to use the scrollbar to locate the terminating header cell.
LinePulse adds the cell location to the header end field.
Next, specify where LinePulse should look for intake mapping data.
To configure intake mapping data
(With an intake mapping table loaded) Click the first empty box following the Data: label.
LinePulse adds a dotted box around the data start field.
Select the cell that marks the start of the header information.
LinePulse adds the cell location to the data start field.
Click the second empty box following Data: label.
LinePulse adds a dotted box around the data end field.
Select the row that marks the end of the header information.
You may need to use the scrollbar to locate the terminating row.
LinePulse adds the cell location to the header end field.
To save an intake mapping entry
After you have made any required changes to an intake mapping entry, click Save Mapping.
A confirmation dialog box appears.
Click OK.
Your changes are saved.
To delete a data source
(If required) Select a plant.
From the Navigation menu, click SYSTEM SETTINGS .
The Settings menu appears.
Click Data Management | Data Sources.
The Data Sources table appears.
In the Data Sources worklist, click  for the data source you wish to delete.
A confirmation dialog box appears.
Click OK.
LinePulse deletes the selected data source.
Configuring Data Sources: Insight Mapping
Insight mapping is the process of classifying the data fields identified by the intake mapping process. LinePulse uses various groups to help the user quickly sort their data into the Acerta business schema, which is a universal format to organize manufacturing IoT data into a common format for use by LinePulse.
By selecting hierarchical data classifications, you will create a data structure that LinePulse uses to provide meaningful insights based on the type of data provided. The resultant classifications are used by various LinePulse modules—such as Anomaly Detection and Cap Metrics—to properly interpret and filter results.
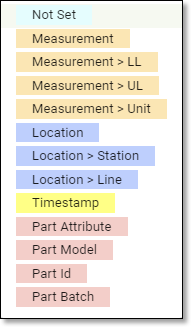
LinePulse uses twelve base categories for insight mapping:
To configure insight mapping for a data source
You must first configure intake mapping for a data source before you can configure insight mapping.
(If required) Select a plant.
From the Navigation menu, click SYSTEM SETTINGS .
The Settings menu appears.
Click Data Management | Data Sources.
The Data Sources table appears.
Click INSIGHT for the data source you wish to configure.
The Insight Mapping screen appears, displaying all of the entries previously configured via intake mapping under the Original Name heading.
Until you configure Data Classification in the next step, LinePulse assigns each entry a value of 'Not Set'.
For each entry, click  .
.
A submenu appears.
Select a Data Classification.
LinePulse updates the Data Classification list to reflect your choice. As you continue to make selections, LinePulse automatically builds a signal by organizing the data into hierarchies.
Repeat the previous two steps, as required.
You can reorder entries by dragging and dropping them to a new location.
Once you are sure you have all entries assigned correctly, click Save Configuration.
 Make sure that all entries are configured correctly prior to saving—while an incorrectly mapped data source can be corrected, previously collected data will not be saved in the same format as data collected following the correction.
If your insight mapping configuration was saved incorrectly, please contact your Acerta Customer Success team using the Acerta LinePulse Support page.
LinePulse displays a dialog box to confirm that your changes were saved correctly.
Last modified: May 29, 2024