Signal Management
Configuring Signal Data: Signal Management
Stations, signals and part attributes can be configured using the Signal Management module. They can either be configured individually or by selecting multiple entities and applying the same properties to all at once. Properties that can be configured include Friendly Name, Entity Type and more.
To select one or more signals for editing
(If required) Select a plant.
From the Navigation menu, click SYSTEM SETTINGS .
The Settings menu appears.
Click Data Management | Signal Management.
The Signal Management screen appears.
![]() To display friendly names in the query tree, select Use Friendly Names, if available.
To display friendly names in the query tree, select Use Friendly Names, if available.
(Optional) Select a Line.
(Optional) Use the search box to locate specific signals.
![]() To reset the search parameters, click CLEAR SELECTION.
To reset the search parameters, click CLEAR SELECTION.
(Optional) Click FILTER to restrict which signals appear in the query tree.
See Working with Query Filters for more information.
Select a signal.
LinePulse displays details for the selected entity.
(As required) Select additional signals.
LinePulse displays details for the selected entities.
![]() To select a block of adjacent signals, select the first signal, then press SHIFT and select the final signal. LinePulse will select all signals 'bookended' between these two signals. Use CTRL to select (add) or deselect (remove) a single entry.
To select a block of adjacent signals, select the first signal, then press SHIFT and select the final signal. LinePulse will select all signals 'bookended' between these two signals. Use CTRL to select (add) or deselect (remove) a single entry.
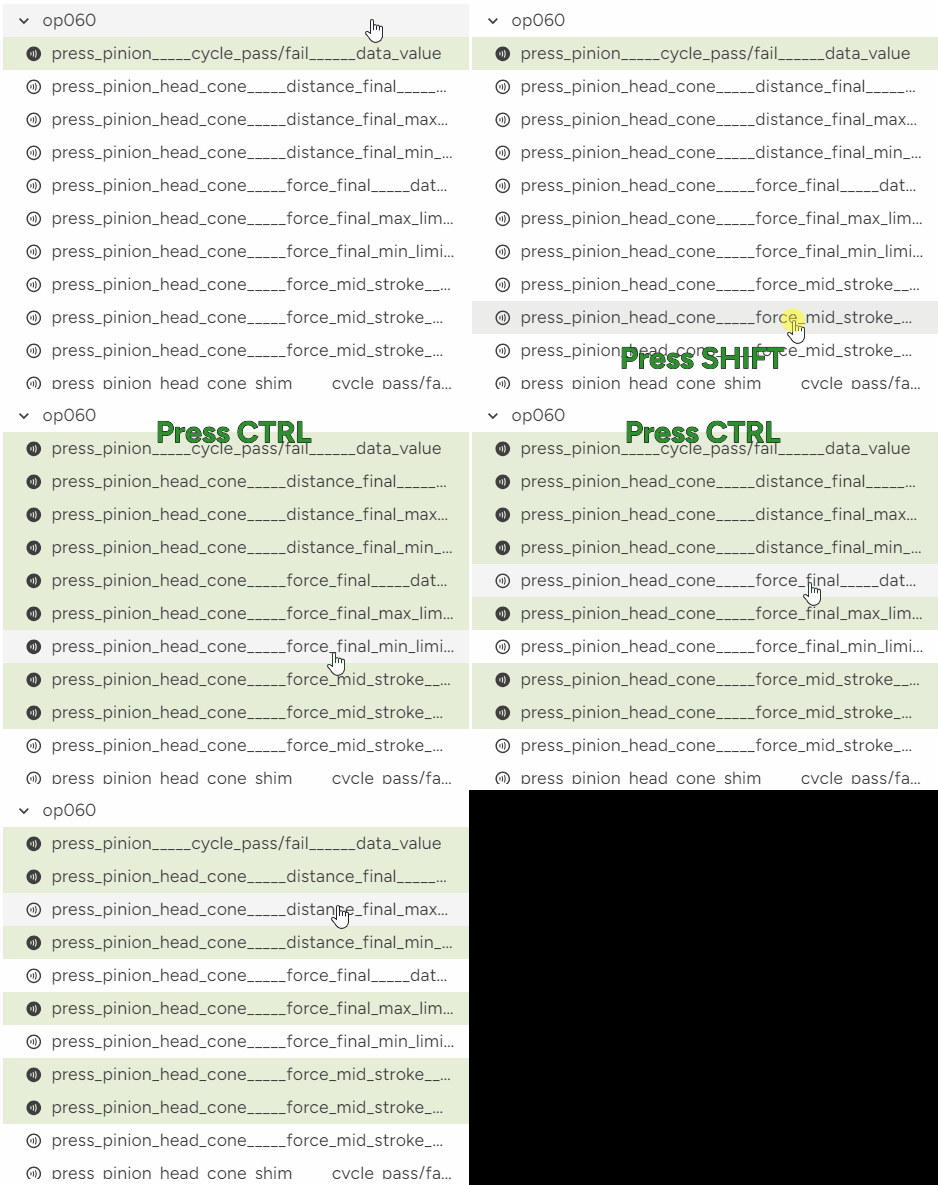
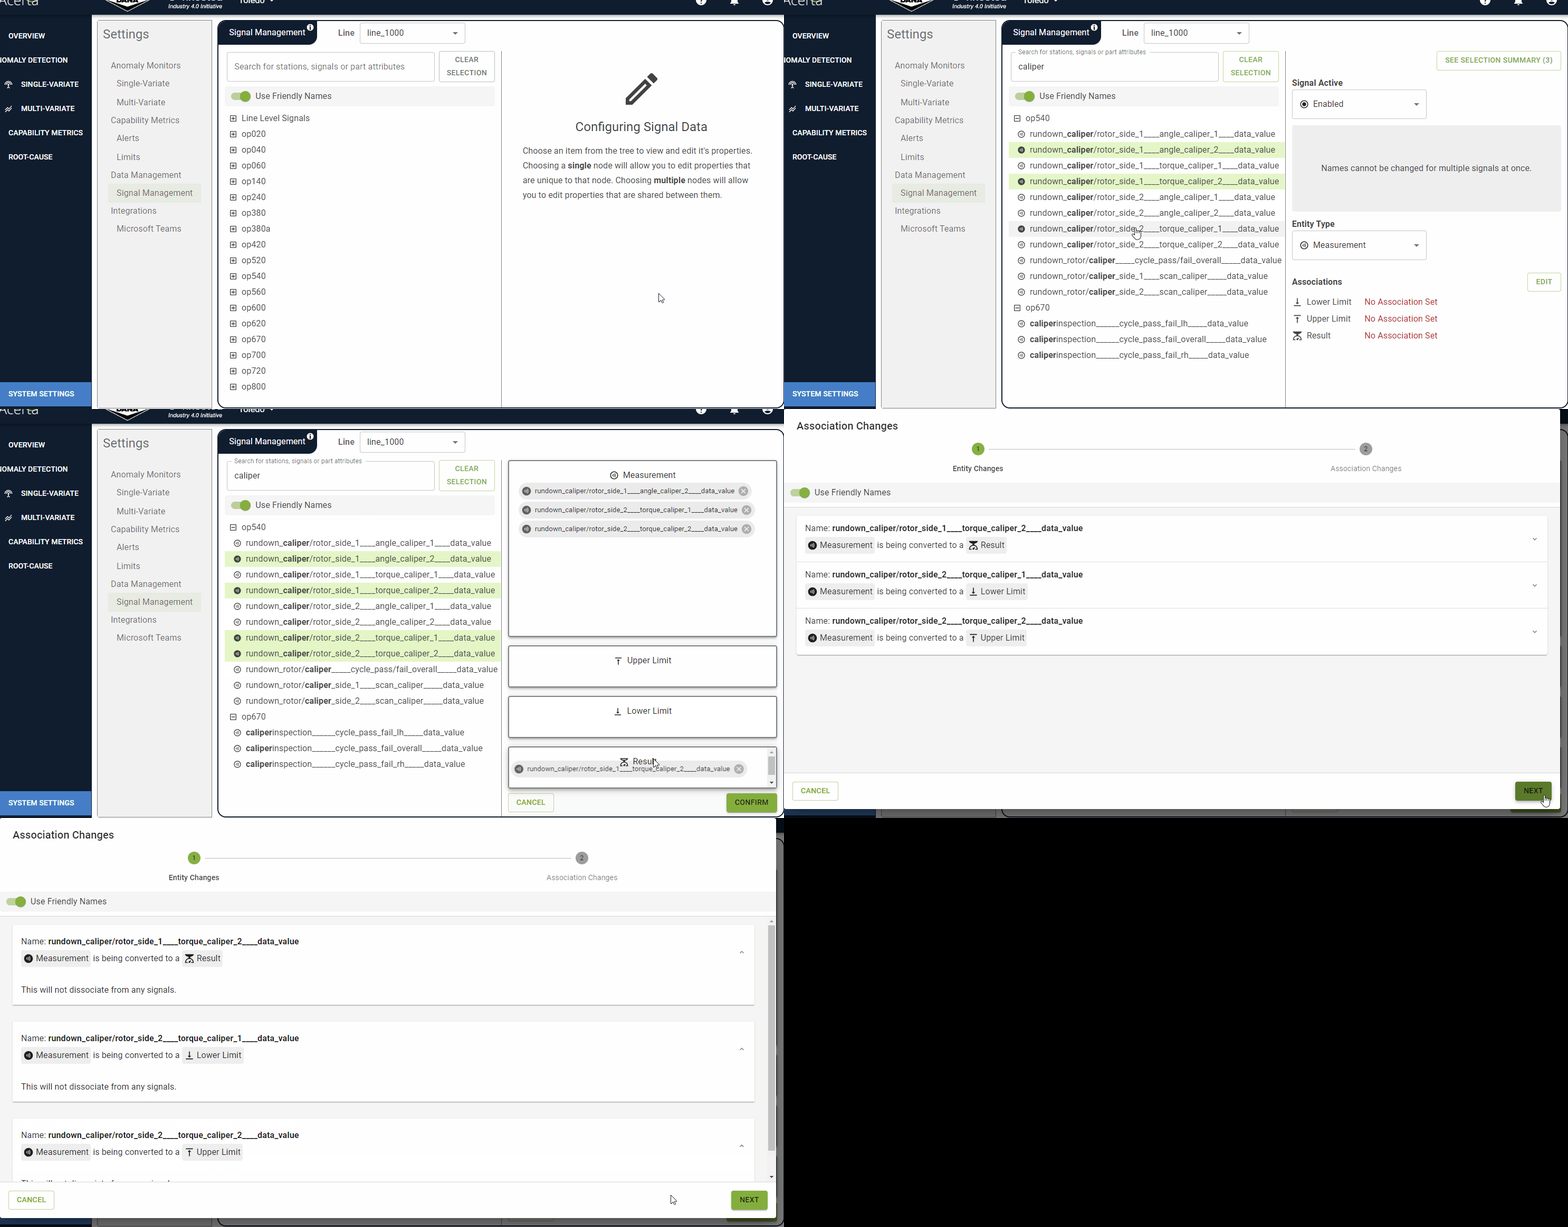
Example of how to multiselect signals
![]() When multiple entities are selected, LinePulse displays properties that are common to all of the selected entities. Only those properties that are common to all can be updated.
When multiple entities are selected, LinePulse displays properties that are common to all of the selected entities. Only those properties that are common to all can be updated.
![]() To reset the currently selected signals, click CLEAR SELECTION.
To reset the currently selected signals, click CLEAR SELECTION.
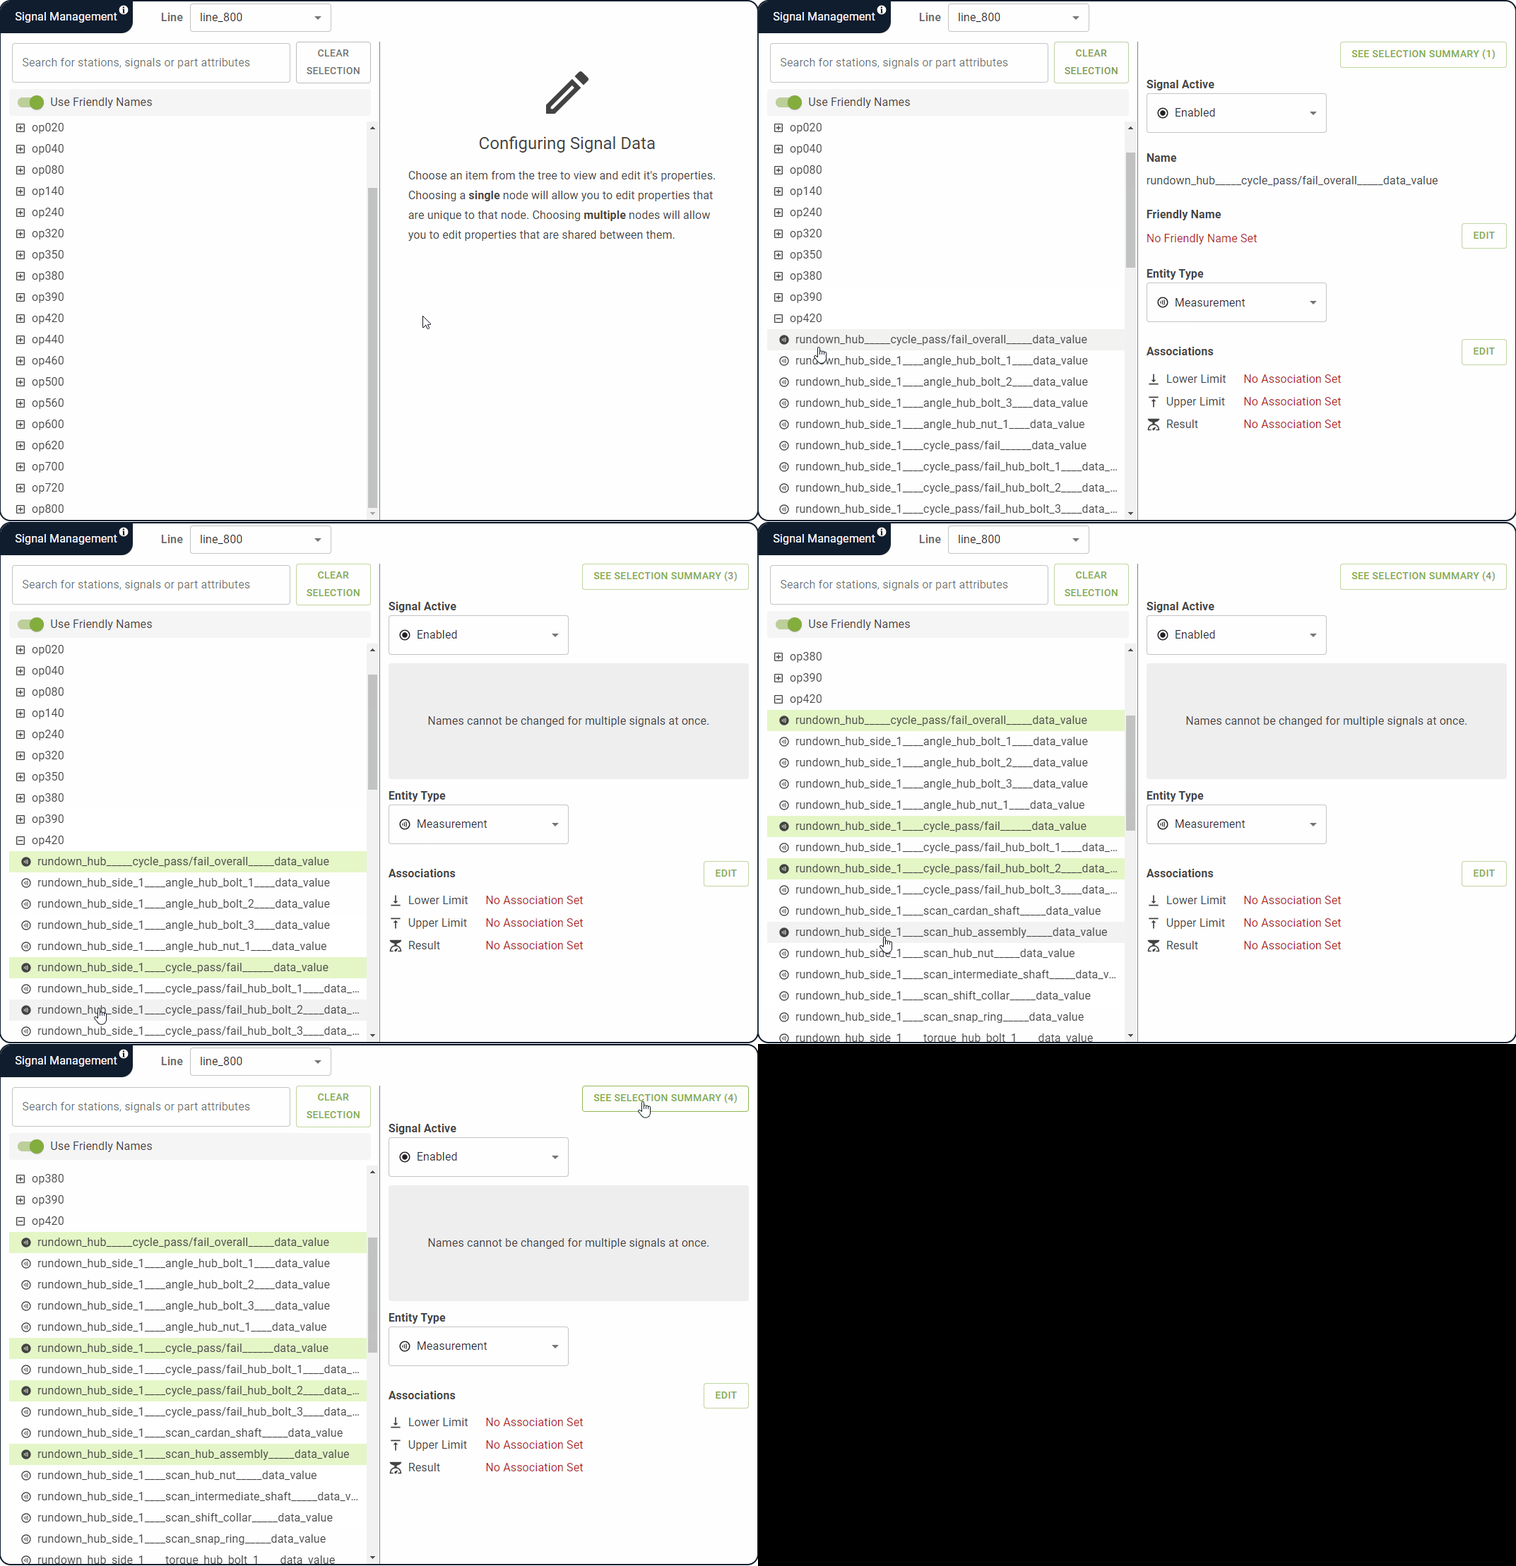
To view a selection summary for your selected signals
Click SEE SELECTION SUMMARY (n).
![]() (n) indicates the total number of signals that are currently selected.
(n) indicates the total number of signals that are currently selected.
The Summary of Selected Measurements dialog box appears.
![]() To display friendly names in the Summary of Selected Measurements dialog box, select Use Friendly Names.
To display friendly names in the Summary of Selected Measurements dialog box, select Use Friendly Names.
Click CLOSE when you are ready to return to the Signal Management screen.
To enable/disable one or more signals
Click the Signal Active dropdown menu.
Select either Enabled or Disabled.
LinePulse updates the selected signals.
![]() Disabled signals will still appear in the Signal Management tree, but will no longer appear in any query builders.
Disabled signals will still appear in the Signal Management tree, but will no longer appear in any query builders.
To add or edit a friendly name
![]() The procedure to create a new Friendly Names or edit an existing one is identical.
The procedure to create a new Friendly Names or edit an existing one is identical.
![]() Only one friendly name can be edited at a time.
Only one friendly name can be edited at a time.
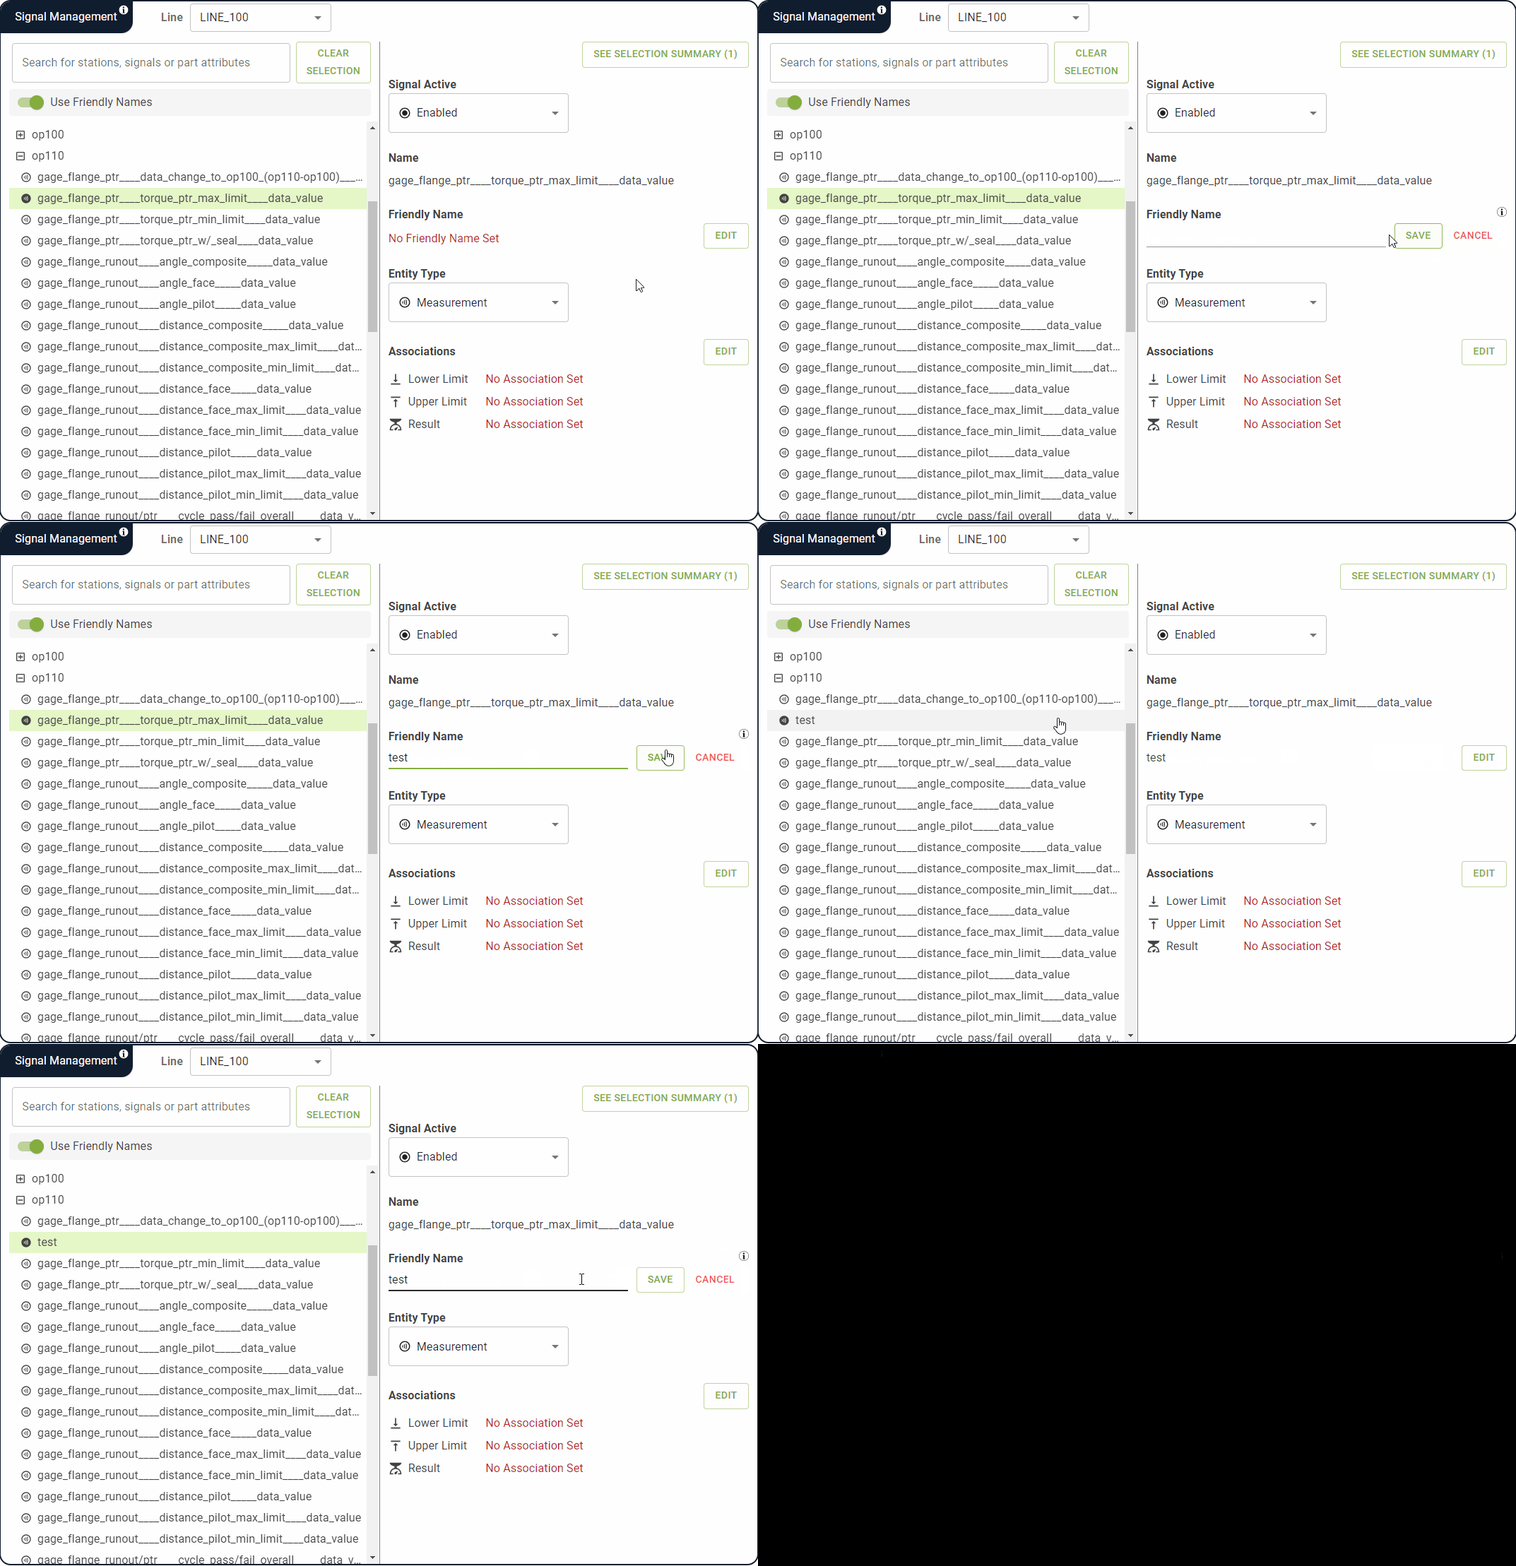
To the right of the Friendly Name field, click EDIT.
LinePulse switches the Friendly Name field to edit mode.
Enter a new Friendly Name or edit the existing one.
Click SAVE.
LinePulse saves your changes.
To remove a friendly name
![]() Only one friendly name can be edited at a time.
Only one friendly name can be edited at a time.
To the right of the Friendly Names field, click EDIT.
LinePulse switches the Friendly Name field to edit mode.
Delete all text in the Friendly Name field.
Click Save.
LinePulse removes the selected friendly name.
To configure one or more signal entity types
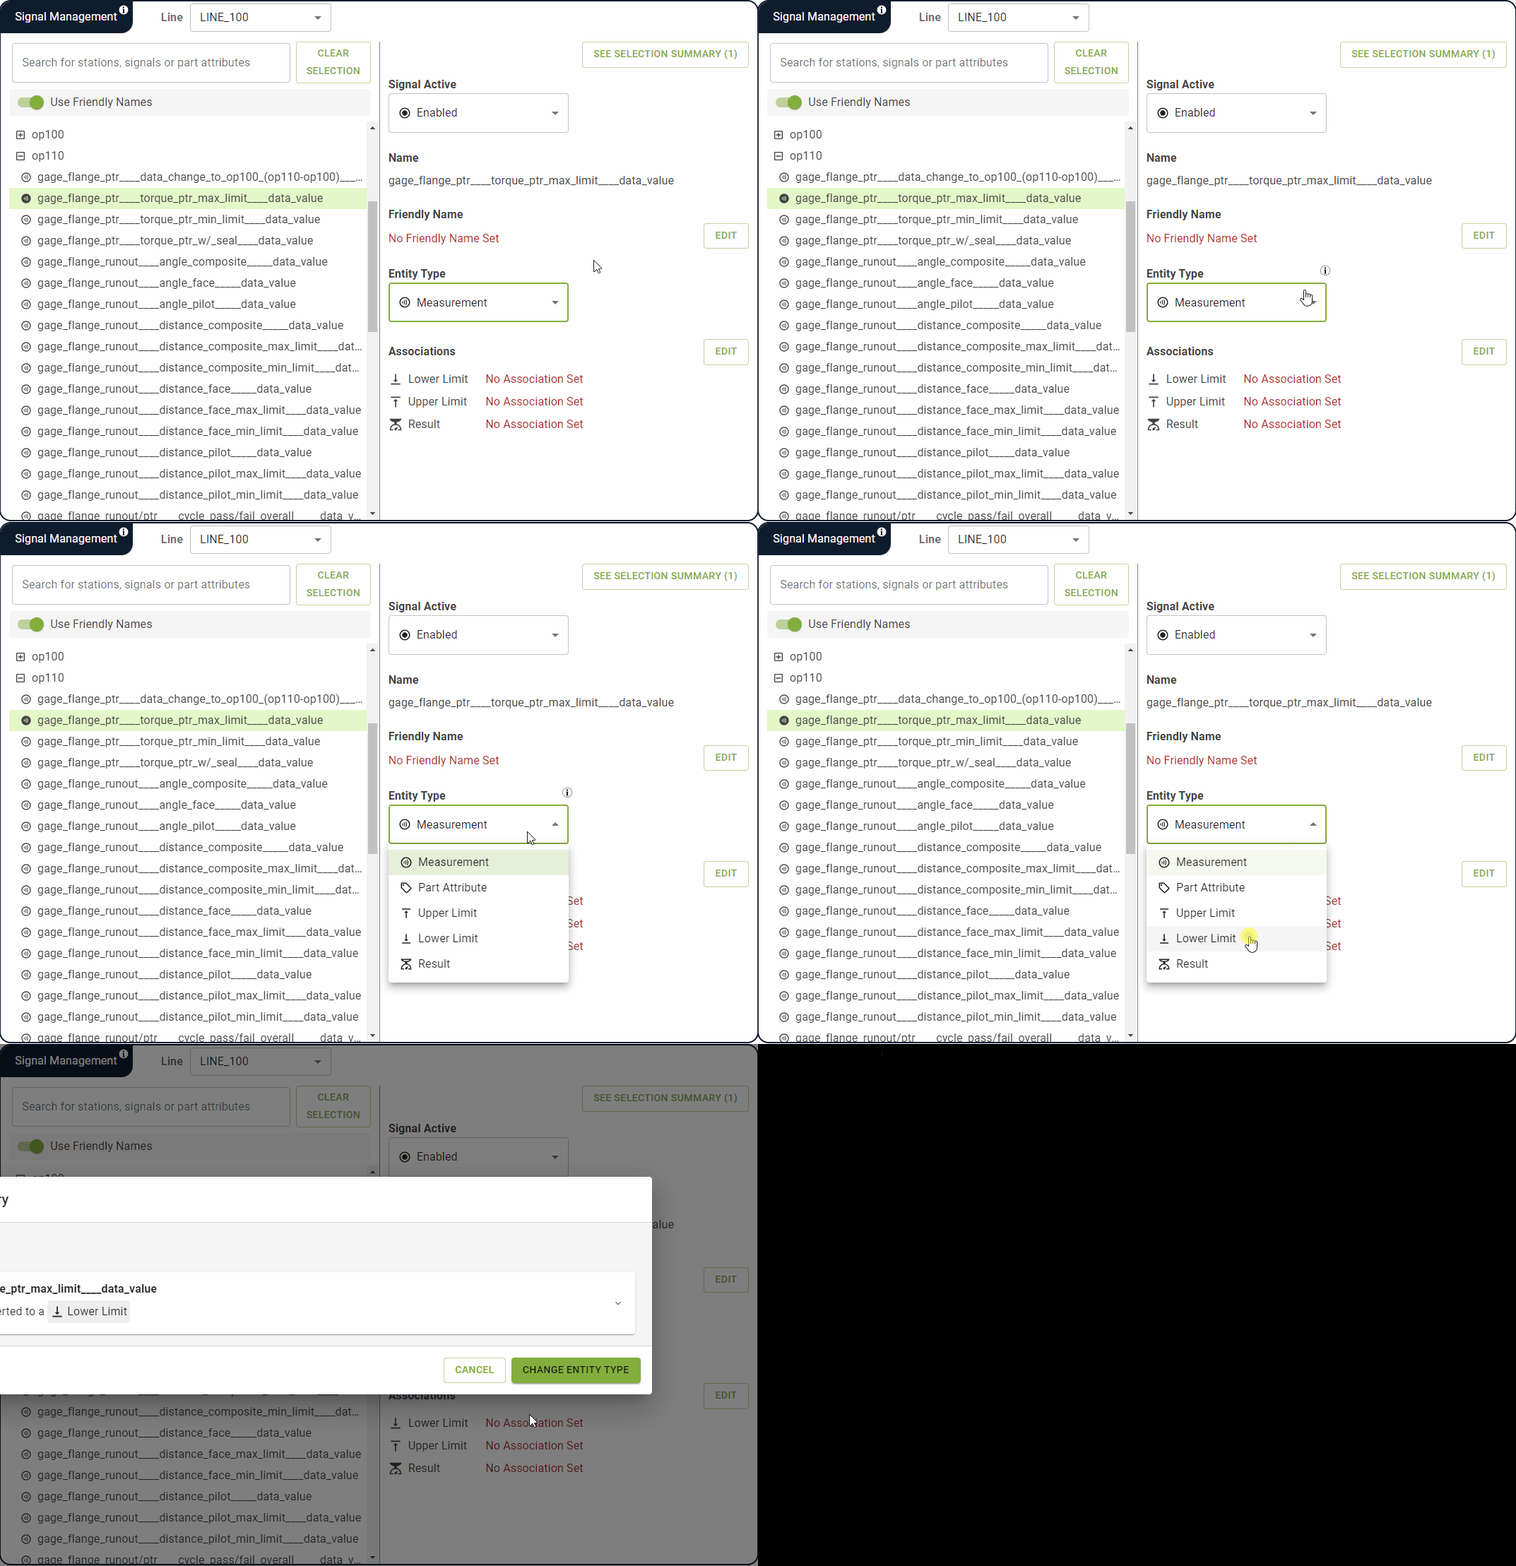
Select the value you wish to change.
The Entity Type Change Summary dialog box appears. Read it carefully to confirm what changes will be made.
Click CHANGE ENTITY TYPE.
LinePulse saves your changes.
To add/edit Quality Characteristics tags
Quality Characteristics are tags that, once applied to a signal, will appear beside that signal throughout LinePulse. These are particularly useful when filtering query builders to restrict a treeview to display only those signals with the same tag applied to them.
Acerta Product Manager Rob Plumridge discusses Quality Characteristics and demonstrates how to apply Quality Characteristics tags.
![]() Only signals with an Entity Type of 'Measurement' support Quality Characteristics tags.
Only signals with an Entity Type of 'Measurement' support Quality Characteristics tags.
Select a Quality Characteristics value.
LinePulse applies the selected Quality Characteristics tag to your selected signals and saves your changes.
To configure signal associations
You can associate signals with other signals to form relationships between them. A signal can be designated as either a: Measurement, Upper Limit, Lower Limit or Result.
To the right of the Associations section, click EDIT.
The Associations panel appears.
Each of your selected signals appears in one of four categories, according to its current association value. The default association value is Measurement.
Click and drag each signal into the desired category.
![]() Click the X next to a signal to deselect it and remove it from the associations panel.
Click the X next to a signal to deselect it and remove it from the associations panel.
![]() As you drag a signal over each box, LinePulse will highlight it in either green or red to indicate whether or not the signal can be associated with that value.
As you drag a signal over each box, LinePulse will highlight it in either green or red to indicate whether or not the signal can be associated with that value.
![]() In general, multiple Measurement values are permitted, but only one value is permitted for each of the other three categories.
In general, multiple Measurement values are permitted, but only one value is permitted for each of the other three categories.
![]() The Measurement box cannot be left empty and will appear highlighted in red if all signals are removed. The CONFIRM button will also be disabled, preventing you from proceeding.
The Measurement box cannot be left empty and will appear highlighted in red if all signals are removed. The CONFIRM button will also be disabled, preventing you from proceeding.
Once you have made all of your desired changes, click CONFIRM.
The Association Changes dialog box appears.
LinePulse outlines all of the changes you wish to make. Review them carefully to ensure that everything is correct.
![]() Click any entry to view more information regarding how it will be converted.
Click any entry to view more information regarding how it will be converted.
Click NEXT.
The Association Changes summary page appears.
Click I UNDERSTAND. SAVE THIS CONFIGURATION.
LinePulse saves your changes.
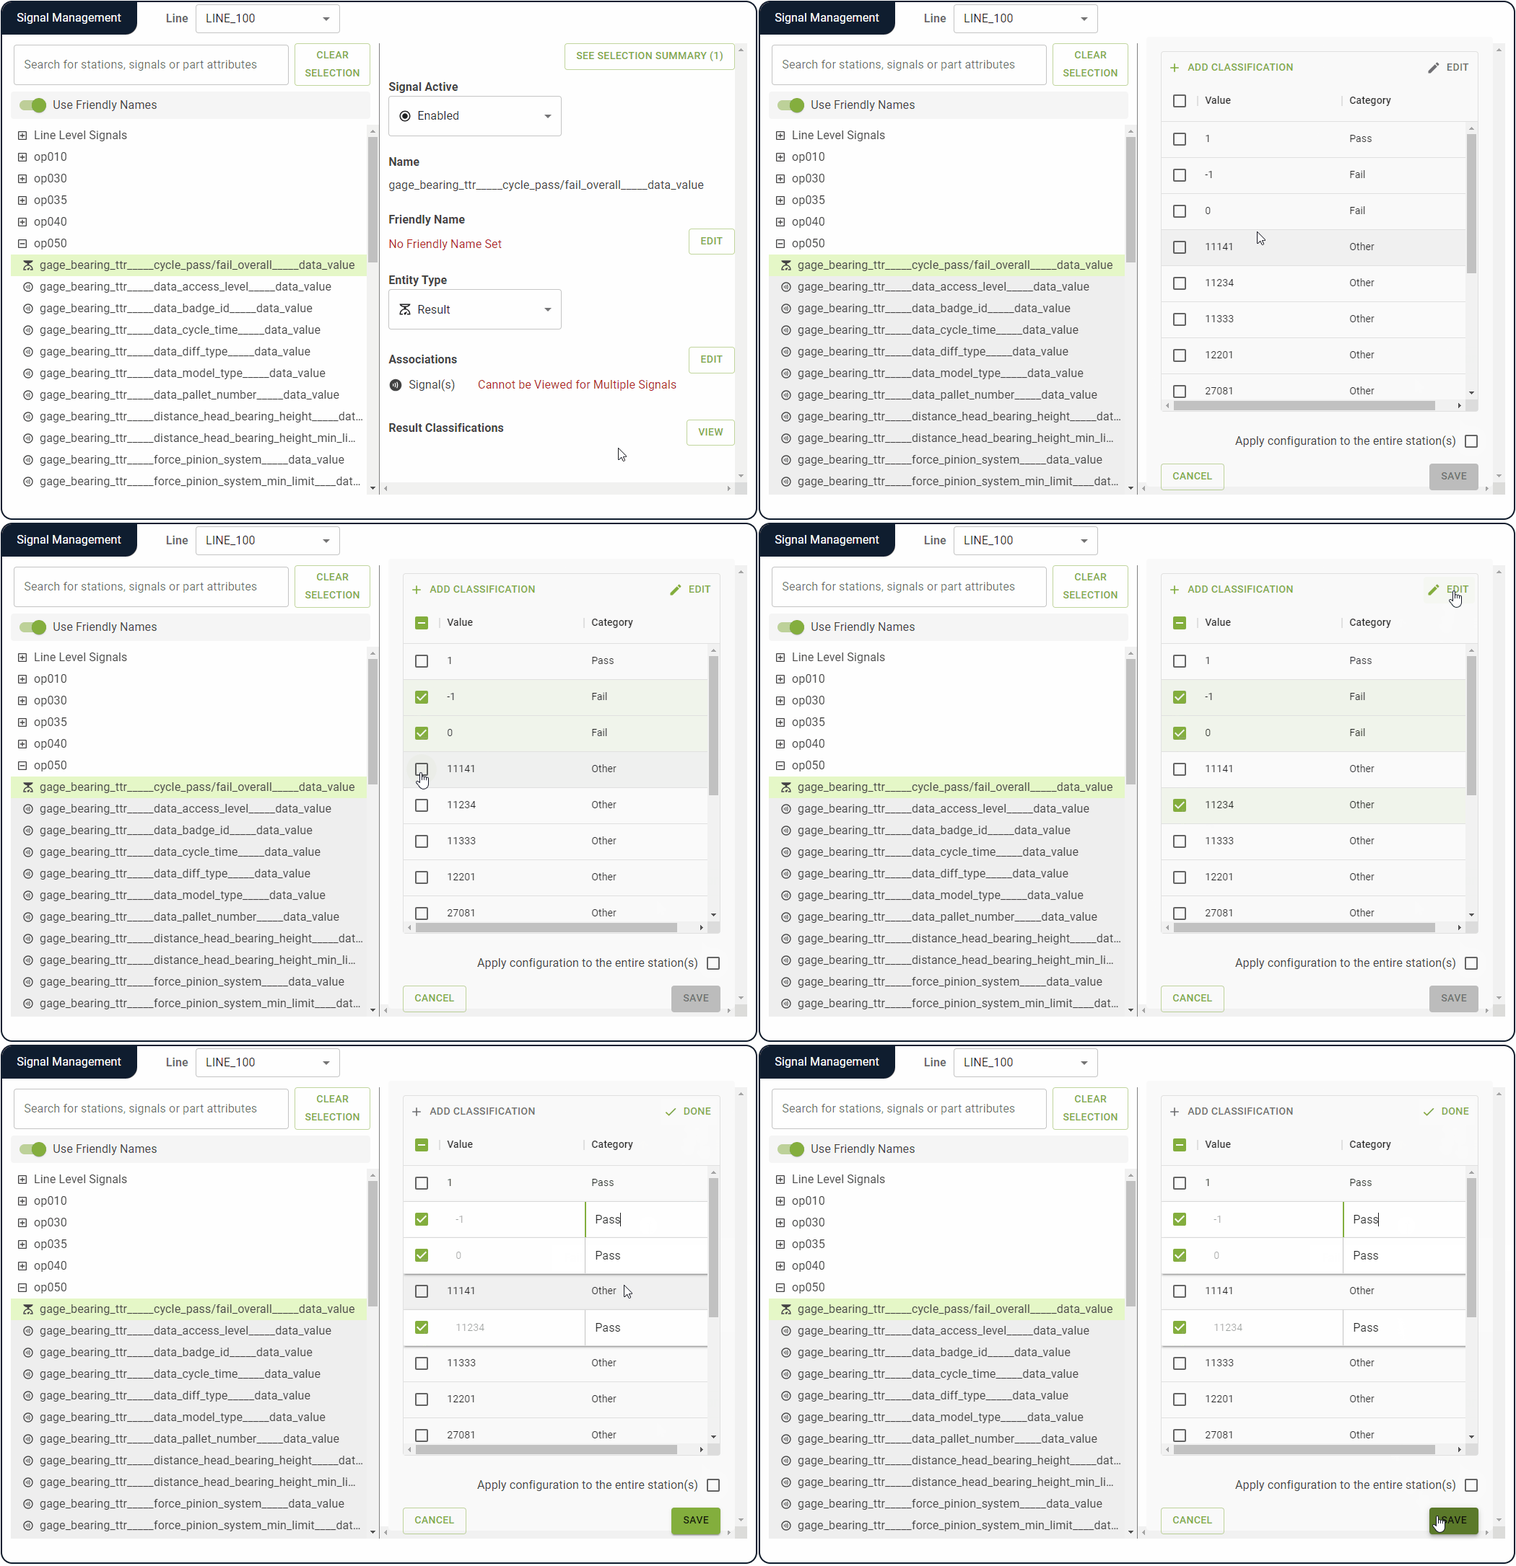
To edit result classification values
Use the Result Classifications section to configure signal result classifications.
![]() Only signals with an Entity Type of 'Result' can be configured.
Only signals with an Entity Type of 'Result' can be configured.
To the right of the Result Classifications section, click VIEW.
The Classifications panel appears, displaying previously configured values.
Select the classification values you wish to edit.
Click EDIT.
Select a new Category for one of the selected classification values.
LinePulse updates each of the selected classification values with this new Category.
(Optional) Select Apply configuration to the entire station(s) if you wish to apply these edits to each Result in the station.
Click SAVE.
LinePulse saves your changes.
Last modified: October 16, 2024